


Description
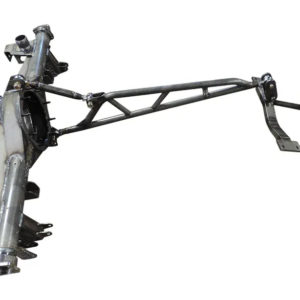
Trick Chassis 9″ Rear axle for 4th gen Camaro and Firebird 1993 to 2002
Below is what comes with it for the base price:
Brand new center fabricated housing can (STANDARD) Others charge $100 more
Internal axle tube gussets (STANDARD) Others charge $75 more
3″ .250 wall DOM axle tubes (STANDARD)
4 lower control arm mounting holes (STANDARD)
28, 31, 35 spline axle options (YOUR CHOICE)
Drive studs included 12mm, 1/2-2″,1/2-3″ (YOUR CHOICE)
Torque arm bracket is included
Housing vent included
wheel bearings included
10 nuts to bolt the center section in
Yukon center section with a spool in it (your choice of gear)
Shipped bare steel
We can narrow for free (see options)
Options for additional charge:
T bolt brake hardware kit (easy install of your stock F body backing plates)
Lube Locker Gasket (Super nice aluminum core gasket with orange elastomer beading)
40 spline upgraded axles (gun drilled)
5/8 wheel studs
11 Hole narrowed lower brackets
Powder coat
Fill and drain caps
Sway bar brackets (these also allow you to bolt the under axle ARB on that i sell)
Coil over brackets
Coil over brackets with no spring perches added
Differential being used ( instead of spool)
Please call or email us for pricing and estimated time:
We offer full bolt in assemblies
Wishbone application
Only torque arm and no other bracket setups
Extreme custom applications (we have done many of these)
Crate and freight available
International shipping* Our website will not calculate dutys/taxes/shipping/broker setups.
Important Information:
Axles are shipped with no bearings on them. Your stock backing plate needs to go on first then the bearings get pressed on behind them.
Axles and center section are dropped shipped and may show up at an earlier or later time than the housing.
When putting on the backing plates, the longer axle goes in the passenger side (right) The short axle goes in the driver side (Left)
non adjustable aftermarket torque arms do not fit without modification.
We recommend adjustable torque arms only
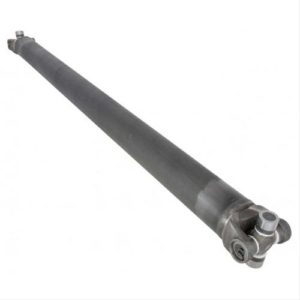
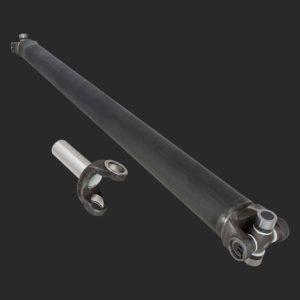
Proper Bearing & Backing Plate Assembly for Trick Chassis 98-02 F-Body 9″ Rear with LS1 Backing Plates
This is a common question, so here’s a step-by-step guide to get it right the first time.
Critical Bearing Installation Steps:
- Install Wheel Studs First – Use Loctite and torque them properly before moving on.
- Position the Backing Plates – Slide them onto the correct axle:
- Long axle = Passenger side
- Short axle = Driver side
- Press the Bearings On – Make sure the O-ring is closest to the axle flange (see pic 1).
- Press on the Lock Rings – Do this only after the bearings are fully seated against the bearing spacer.
- Install the Seals – Use a seal installer to press them into the housing ends (see pic 2).
Getting these steps right ensures a proper fit and long-lasting performance. 🔧
Pic 1
Pic 2

Reviews
There are no reviews yet.